
The Node Joint is the intersection of a header pipe with multiple other branch pipes.
The resulting joint is intended for use in structural truss construction, but can be useful in some complex pipe fitting applications as well.
Up to 70 pipes can be combined into a single node joint. Though the practical limit is far less than 70. A template is generated for each of these pipes: one for the header pipe and one for each of the branch pipes. The branches are added in the order they are listed in the parameter window. The joint is constructed one pipe at a time so the order of the list of pipes is very important. The end of each pipe can intersect with any earlier pipe. In these cases, a hole could be created in the earler branch pipe. The resulting template will be a combination of an end cut and any number of holes. The result is the possibility of very complex joints. Careful analysis should be made to determine if all the holes shown on the template are really needed. The software tries to make a best guess as to what the user's intent is. But it will error on the side of caution and include holes that you might not need. In some cases, where holes overlap, you might want to use part of a hole and ignore another part of it. Looking at the 3D rendering of the joint will make these cases obvious. Just ignore those holes when you are constructing the joint. If this is a structural assembly, select 'Surface' under 'Joint Construction:Branch ends' and 'No Cut' under 'Joint Construction:Hole bevel type' and no holes will be generated.
Click 'Add Branch' to insert a new branch into the joint. The new branch will be added to the end of the list as the last pipe to be assembled. You can, however, move the branch within the list by using the small up and down arrows at the top of each branch section. The 'X' by these arrows deletes that branch.
Pipes with cutlines which can not be generated with the parameters specified without causing interference between pipes are colored red in the 3D preview window. If you see a warning in the status bar, check the 3D window to see what the problem is. Sometimes it is something simple that you can tweek manually when assembling the pipes.
Unlike other more simple joints, the resulting joint can not be guaranteed to be gap free. There are some configurations (especially if Perpendicular construction is selected) that can not be created without either gaps or interference between the pipes. The 3D preview window will show you what the templates will build. Use the asm-exp slider to see how the joint assembles. Some manual tweeking of the cuts may be needed. Specifically, pay attention to the places where the cut ends of two pipes are touching each other. When using "End bevel cut: Perpendicular Cut" some external corners of the ends may need to be ground off to allow the pipes to be positioned close enough to avoid gaps in the resulting joint.
Also, avoid using "Hand Beveled" in Joint Constructions. In most cases the result is not useful. It is included to support the most simple cases where it could sometimes be useful.
Warning: some very complex and impractical joints can be created with this software. Sometimes reordering the sequence that the pipes are assembled will simplify the joint. (Use the up and down arrows in the parameter window.) Some complex joints my be fun to generate in software but shouldn't be built in real life. Use common sense before attempting to build a joint. Check the 3D preview window to see if you really want to build that specific joint.
Parameter Constraints:
Joint Name: name of this joint which is unique to this project or currently opened joints
Header OD: (Outside Diameter) must be a positive number. Making this a negative number will disable this branch. This technique can be used to temporarily remove a branch from the node assembly without deleting it.
Header Wall: must be a positive number, less than half Header OD
HeaderAngle: -360 deg. to 360 deg. To match behavior of previous versions, enter 0 deg for Header Angle.
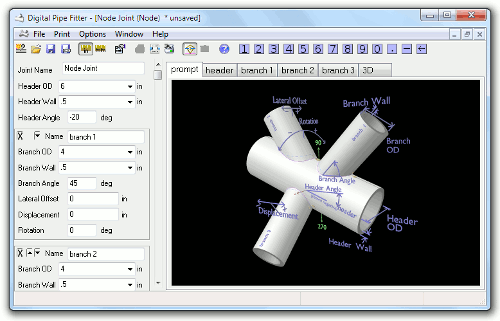
Name: The name of each branch which will appear in the 3D render, as the label on the template preview tab, and on the report and template outputs. This field is limited to 10 characters.
Branch OD: must be a positive number.
Branch Wall: must be a positive number, less than half Branch OD
The following parameters are available for each of the branches in the joint
Branch Angle: 0 deg. to 360 deg.
90 deg. is a perpendicular joint
180 deg. is parallel to the header pipe.
Lateral Offset: Any positive or negative distance that the branch can be moved sideways.
Displacement: The distance along the header axis where this branch is positioned.
Rotation: The angle around the header axis that this branch is rotated. Lateral offset is applied before Rotation. So, by lateral we mean relative to the final direction of the branch.
Joint Construction:
On Surface: The end of the branch pipe rests on the outside surface of the pipe it intersects with.
Aligned: The outsides of the pipes intersect and the insides of the pipes intersect. This is like a miter joint is constructed.
Joint Construction Notes:
If 'Aligned' Joint Construction is selected, Hole bevel type can not be 'none'. An aligned construction, requires hole cuts and end cuts to make the joint.
Warning: When using "Perpendicular Cut" for "End bevel type", some unexpected effects might appear when the cut bevels of two pipes run into each other. The software may create cutlines which result in interference. Some hand work my be required to clean up these points. Usually, it involves grinding off some of the exterior of one of the pipes at an angle to avoid the interference but leaving the two pipes in contact. There are cases where "Perpendicular Cut" solutions are not ideal and will result in gaps in the joint. The software is trying to avoid these gaps and sometimes needs manual tweeks to the pipes to make them fit perfectly.